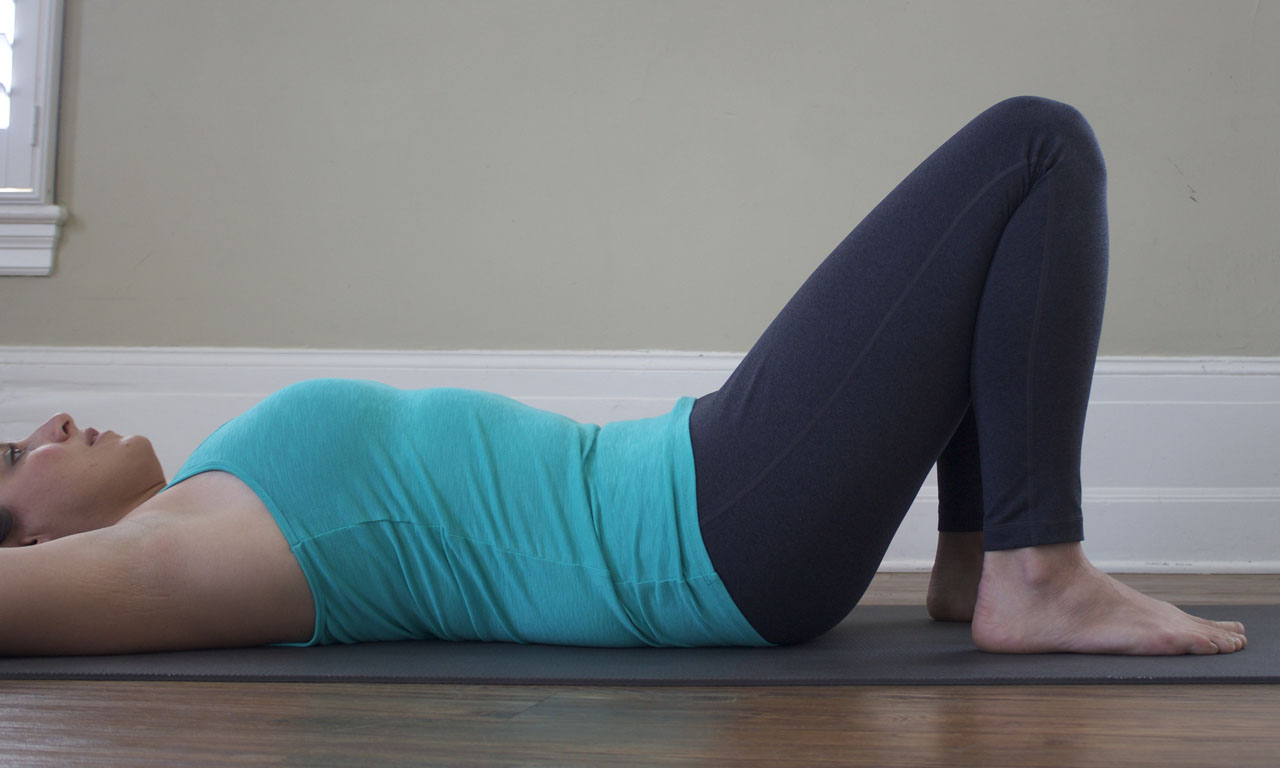
Bridge Pose
Setu Bandha Sarvangasana is the foundation for all the supine backbends that lift the spine up and out of gravity.
This pose is a powerful teacher. Bridge pose becomes the foundation for all the supine backbends that lift the spine up and out of gravity. It also builds the strength needed for the shoulder stand family of inversions. On the surface, Setu Bandha looks simple enough and it really is safe enough that nearly everyone should be able to do some version of it. With all simple postures though, as you gain familiarity, you must build awareness and learn to fine tune the actions that support it.
Bridge is a pose which often times relies on the mechanical help of binding the hands to draw the shoulder blades deeply behind you. I think though, that using this particular mechanical advantage can cause harm to the neck over time, and it also cheats you out of building strength in the areas necessary to support you in the postures I mentioned above. In this case, learning to manipulate the position of the scapulae muscularly is integral to both safety and advancement.

It is common to try to lift the sternum so much that the neck collapses and the throat gets compressed.
When the scapulae work behind the Heart effectively, and the back-neck works to support it’s own extension, there is no collapse and the throat remains clear.
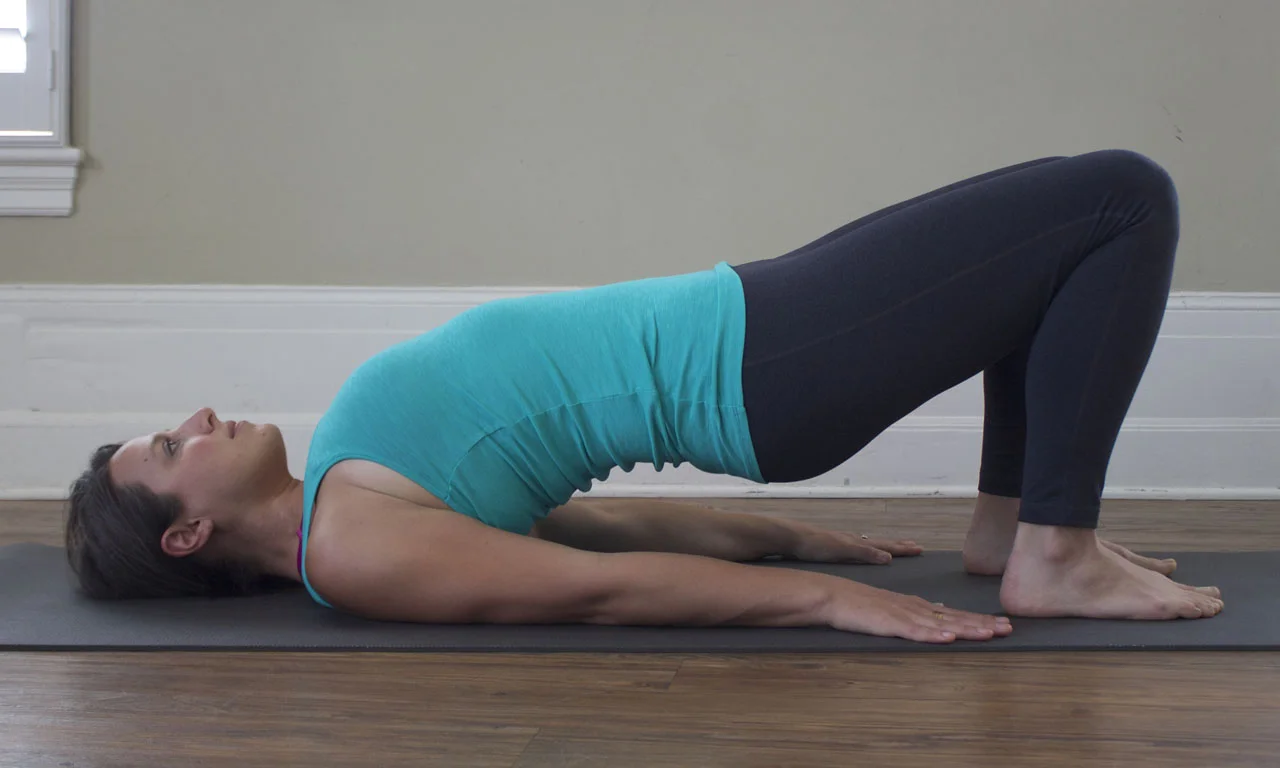
Ideally, a well built bridge posture succeeds in suspending the entire length of the spine up and away from the mat. As you’ll see below in the cueing, there are a couple of alignment points that differ from some of the traditional instructions I’ve heard in my practice over the years. Particularly, it’s important to offer the neck and throat muscles a bit of slack to avoid straining due to overstretching — over stretched muscles are weak after all — and to prevent C7 from jamming into the ground. Hopefully, you’re also becoming familiar with my assertion that the tail shouldn’t be tucked and the lumbar spine should remain in its natural extension. More explanation for this can be found in this article.
I believe that by using these cues, you’ll find more ease and a more natural expression of this primary backbend.

The lumbar curve should be supported by the engagement of the abdominal muscles pulling in uniformly front, side and back.
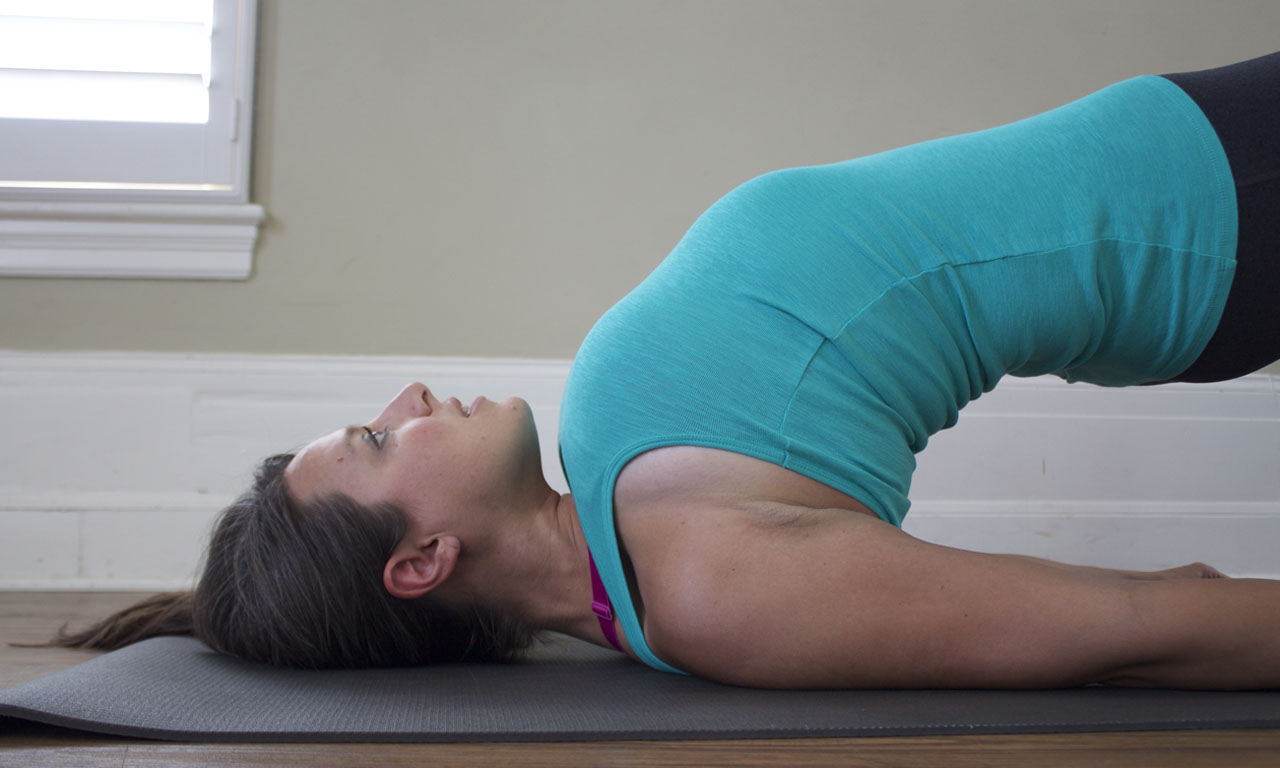
Supine, all curves engaged, knees bent, feet flat and hip width.
Laying on your spine, you should remain aware of the neutrality of the the spinal curves. Specifically, resist the urge to press the lumbar spine into the mat, since it is most stable when the muscles engage to support the lordotic curve.
Ankles should be just under the knees, shin bones upright.
If the knees are bent too much or too little, your leverage will be off. Knees bent too deeply stresses the knee and overloads the quadriceps tendon. Knees not bent deeply enough will form a bridge pose that’s too long and you’ll strain through hamstrings/glutes to reach your optimum height.
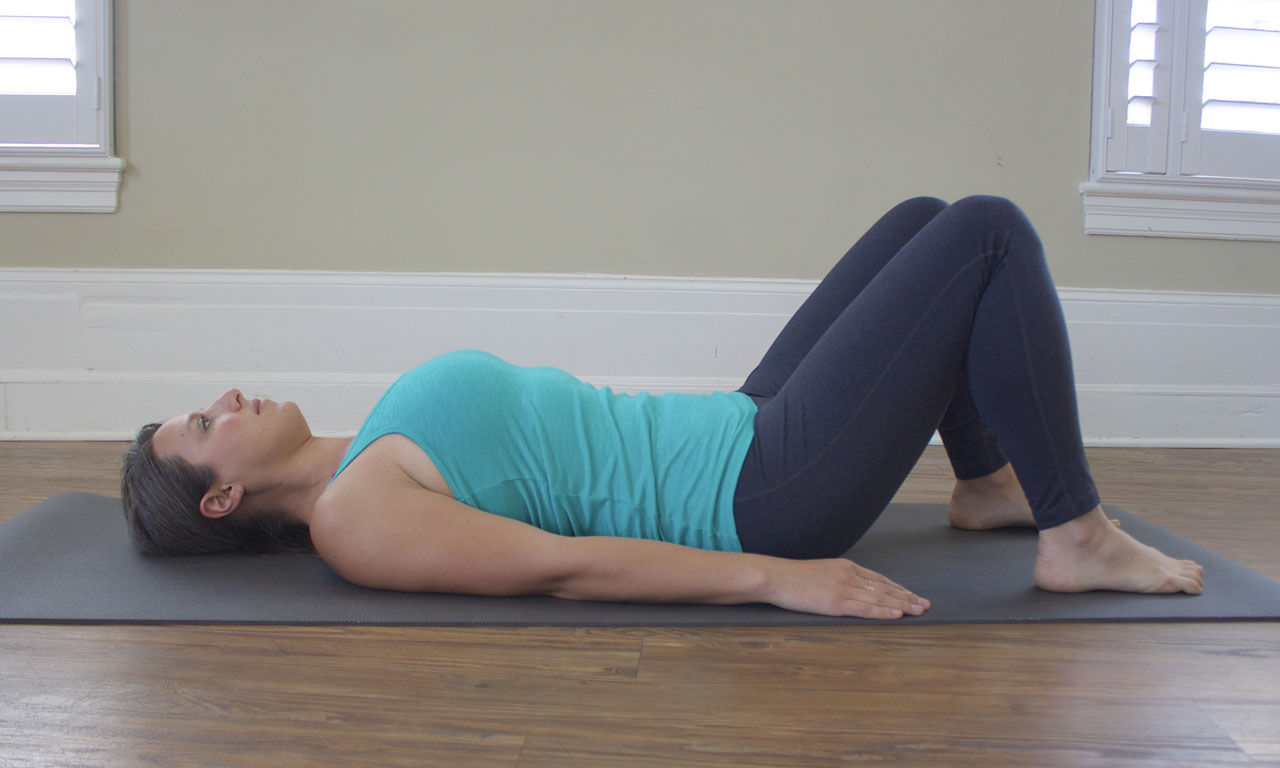
In this position, the quadriceps on the front of the thighs will have to work too hard. The ankles should align directly under the knees.
Reach arms overhead to help lift and neutralize the scaps.
Reaching overhead adds length to the side waist lines, creating space between the ribcage and pelvis as well as between the individual ribs. This space between the ribs is necessary to emphasizing the extension in the thoracic spine.
Keep the scaps where they are as you take the arms back down to your sides, palm down.
You don’t want to draw the shoulders away from the ears or toward the tail. If your scapulae pull too low, the collarbones will hang up on the upper ribs when you attempt to adduct them (pull them behind the heart). You can also over stretch the neck muscles and weaken your ability to support the neck spine.

If you pull the shoulder blades down the back, the neck is strained and the collarbones jam into the upper ribs.

Your shoulder blades should be neutrally aligned to allow for softness along the neck muscles and space for the collar bones to broaden.
See how tucking the tail actually eliminates the natural backbend of the lumbar spine? This is the opposite of what we’d like to achieve in Bridge Pose.
Pull tail gently toward the back of the heart, engaging the muscles of low back and supporting the lumbar lordosis.
Bridge is a backbend, so it’s smart to support the backbend that already exists in a neutral lumbar spine. This shape should not change much once you start lifting away from the floor.
Wrap belly muscles into organs in support of the curve.
The hydraulic nature of the belly is a much more stable support apparatus than just the counteraction of the abs working against the spinal extensors. Compressing the fluid body with all the abdominal muscles — transverse abdominis, internal and external obliques, and rectus abdominis — creates a very strong and stable environment for the lumbar lordosis on all sides. It also reinforces the space between pelvis and ribcage.
Press the kidneys/T10 gently toward Earth as you engage the solar plexus muscles deeply toward spine.
This action helps decompress the low back by creating length up the spine into the thoracic region. It’s sort of a traction system to keep you from jamming the back ribs down into the lumbar spine. On the front body, the solar plexus anchors the front ribs so that expansion can happen along the joints of the sternum when the backbend is fully expressed.
Squeeze scapulas toward one another to help ground them.
You should start to feel the Spines of the Scapulae meet the mat and the heart-spine lift slightly away from the mat. You may want to wiggle the scaps a little closer together one at a time, but try to do this using the strength of your traps and rhomboids, NOT with the mechanics of clasped hands. Eventually, your thoracic and cervical spine are suspended cleanly away from the mat.
The throat is soft and back of head GENTLY presses into mat.
It’s very easy to clench the jaw or harden the mouth and throat here. Remain aware enough to keep this region relatively soft. The back of the head may gently press down to help engage the extensors on the back neck, creating support from beneath you to avoid collapse.
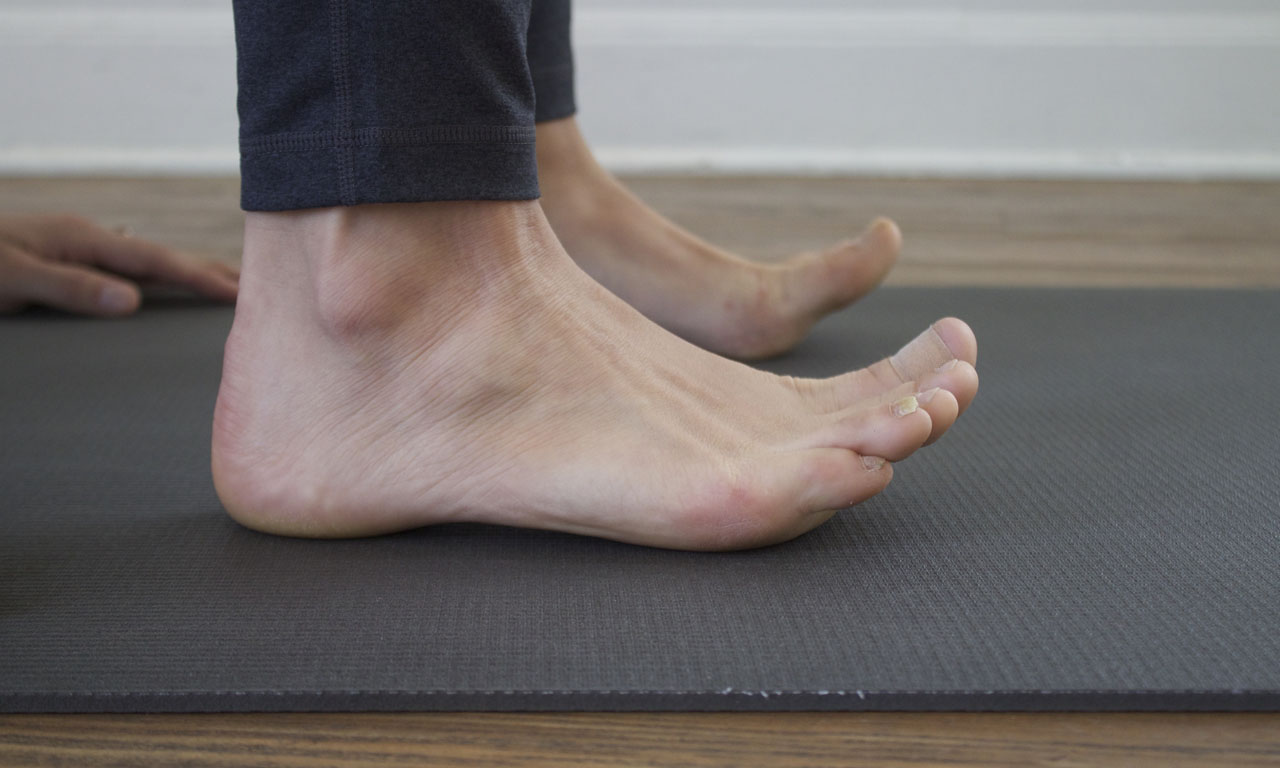
Your feet should be just as active here as they are in Tadasana, Mountain Pose.
Inhale, reaffirm your feet to the mat and belly engagement.
To find Pada Bandha, press through the mound of the big toe and the outer heel at the same time. This creates a subtle sense of diagonal action and activates all three arches. It also helps to balance the adduction/abduction counteraction generated in the hips. Maintain the action of the abdominal compression.
Exhale, press the entire spine up off the mat as one unit.
Now you’re flying! The feet and arms press equally down into the ground in order to rebound through the entire spine.
Make sure thighs are active but glutes are not clenched.
The glutes will be working, but should never clench. Clenching tends to undermine the stability of the lumbar spine and also limit the fine mobility of the tail if it’s ever needed. Let the thighs do the lifting here, and let the pelvis come along for the ride.
Press down with entire arm and hand, squeeze shoulders and begin to accentuate the lift of the sternum toward sky and lengthening toward the chin.
This is where the action really happens. Since the lumbar spine is already in extension, the work is really in trying to get the thoracic spine to move from it’s typical flexion into extension. This can be subtle, difficult but powerful work. Using the upper extremity is one way of supporting the coiling of the back heart-spine while encouraging the expansion of the front heart/sternum/ribs. Remember not to clench the jaw, mouth or base of skull here.
Maintain the natural curve of the lumbar spine and contraction of the solar plexus as the traps, rhomboids and ESG’s contract behind the heart to expand the chest.
This is a continuation of the coiling behind the heart to expand the front of the heart. The tail can remain almost heavy as the thighs and ribs lift and lengthen.
Even the efforts of the legs should be invested in raising and lengthening the heart, not getting the hips higher.
Imagine the knees and pit of the throat lengthening away from one another. Avoid the sense of pelvic thrust so often associated with this pose. There’s no need to blow open the front of the hip joints, as this will only destabilize the continuity of the backbend.
Once you’ve maxed out, hold shape for five breaths.
Holding steady here will build your stamina and allow you to focus on the flow of the breath.
On an inhale, soften the heart and begin to neutralize the spinal curves.
In preparation for coming back down, begin to unwind the back of the heart and shorten the sternum slightly.
On exhale, take the entire spine down to the mat as one unit.
I like to imagine my entire torso shifting closer to my heels as I descend. This makes space for the full neutralization of the spine so it can meet the Earth as one unit, as well as shifting the shoulder blades even closer to the ears in a PASSIVE way, releasing any tension that may have built up there from the efforts of the upper extremity.